Windows 10 has already proven to be a reliable operating system, but like with any piece of software unexpected things always will happen. Perhaps one of the worse issues you can come across is a black screen on your Windows 10 computer, because you don't get an error code or message giving you an idea where to start troubleshooting.
An unexpected black screen can occur in a number of scenarios on
Windows 10, stemming from issues with the graphics driver, a connection problem between with your display, during the installation of the operating system, updates… or it just can happen randomly at any time.
In this
Windows 10 guide, we'll walk you through a series of steps to help you troubleshoot and fix the black screen problem on your device.
How to fix black screen on your PC
Installation in progress
If you see a black screen during the installation process, depending on your hardware and data on your device the operating system may still working in the background. Sometimes it could take several hours to complete the process.
The best thing you can do in this situation is to wait, but if it's been anywhere between 3 to 6 hours, then chances are that the installation process is stuck.
If the installation is stuck, you should try shutting down your device completely. You can force your computer to shutdown by holding down the power button for about 10 seconds or until it shuts down, and then unplug the power cord.
In the case that you're using a laptop, it's also a good idea to remove the battery if possible (though increasingly that is not possible).
Then make sure to disconnect all the non-essential peripherals, including external storage, phone, printer, game controller, network cable, and secondary monitor. If possible, also turn off your Wi-Fi and Bluetooth adapters. Only leave connected to your computer the essentials: keyboard, mouse, and display.
Wait 60 seconds, reconnect the battery and power cable, but do not reconnect any of the peripherals, and power on your computer.
If this was a mere hiccup, the installation process should resume and complete successfully. Once you're on the Windows 10 desktop, remember to reconnect your peripherals and other devices.
Double-check your video connections
If your computer gets a black screen before you sign into Windows 10, it could be a connection problem between your PC and the display.
In the case that you're using a desktop computer, double-check your display is connected properly to a power outlet and your computer.
When possible it's also a good idea trying to switch to a different video output. A lot of times a video driver can change and without a particular reason it can send the video signal to a different output port (e.g. DVI, HDMI, DisplayPort, Thunderbolt, VGA) or adapter.
If you installed a discrete graphics card, but your computer also includes an integrated video processor, you can also try switching the video connection to the integrated graphics as it could be a problem with the discrete card.
You can also try to connect a different monitor to your desktop PC or laptop to confirm that it's not a problem with your primary display.
If the computer isn't detecting the display, then you can try using the Windows key + P keyboard shortcut, press P again and then Enter. You'll need to repeat this steps a number of times to cycle through all screen options.
If you're connecting your PC to your TV, double-check the TV is turned on, and make sure to set the correct input to connect to your device.
Try to wake up the display
Many times it could happen that Windows 10 is just not detecting the display. Using your keyboard, you can use the Windows key + Ctrl + Shift + B keyboard shortcut to wake up your display.
In the case that you're using a tablet, the process to wake up the display is a bit different, press the volume up and volume down buttons simultaneously three times.
Disconnect non-essential devices
An external device connected to your computer could be the problem of a black screen. Try disconnecting all your peripherals.
If everything returns to normal and you no longer see a black screen, then try reconnecting one peripheral at a time. If your computer monitor goes black again, then you may have identified the device that is causing the problem. Disconnect the device in question, restart your computer, and if the device continues to produce a black screen, contact your device manufacturer for assistance.
Boot in Safe Mode to troubleshoot and fix a black screen problem
In the case that there isn't a problem with your external devices, there could be a number of other reasons, and you can boot your computer in Safe Mode to try to fix the problem.
You can get your computer to boot in Safe Mode in a number of ways, but in this case, you can do the following:
- Start your PC.
At the sign-in screen, hold the Shift key down, click the Power button on the bottom-right, and select Restart.
If you cannot see anything on the screen because of a black screen, then start your PC, as the blue Windows logo appears, press the power button and reboot again. Repeat these steps three times until you trigger Windows 10 automatic repair. Follow the on-screen directions and launch the advanced options menu.
Once you're the advanced startup menu, click Troubleshoot.
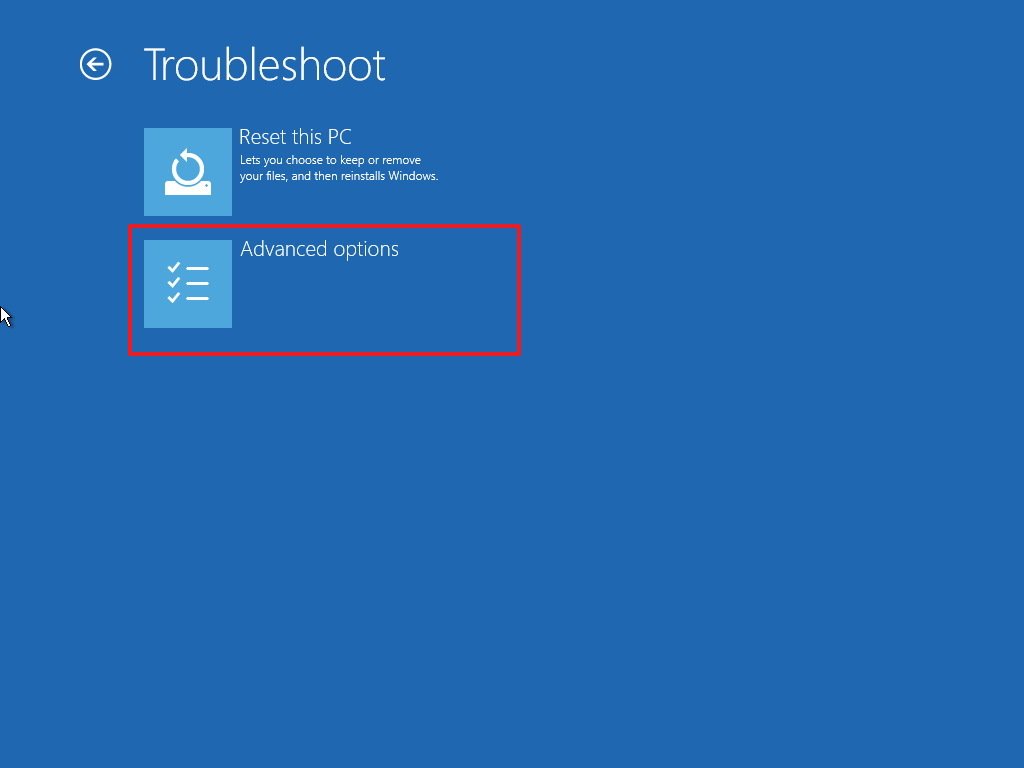
Click Advanced options.
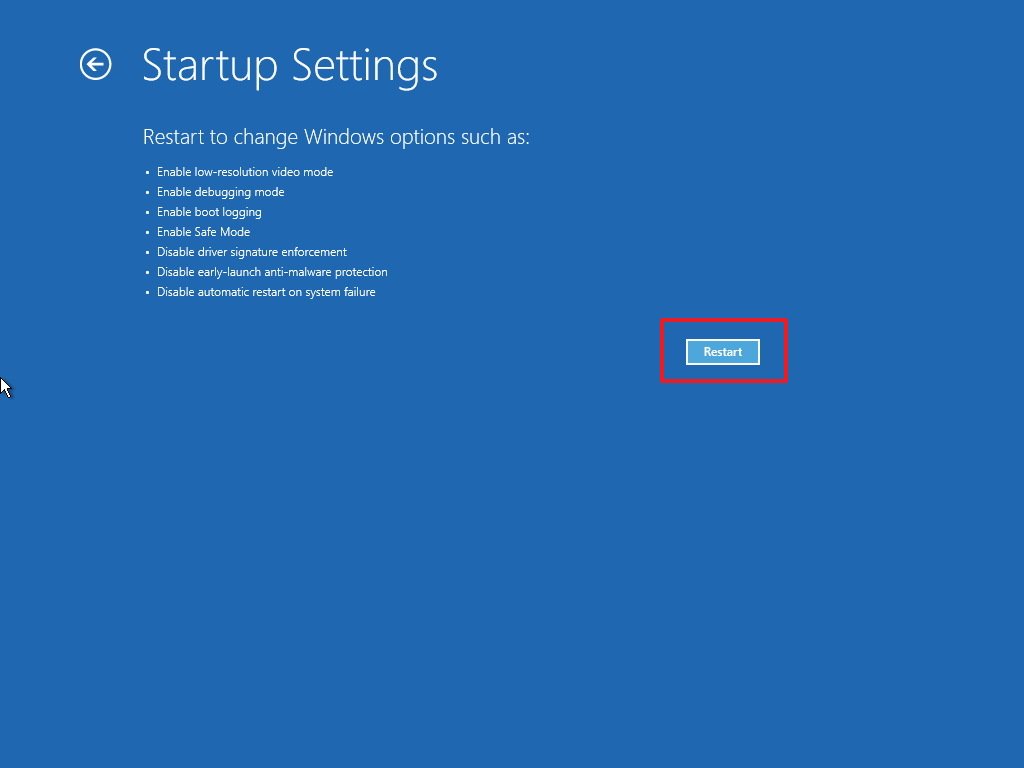
Click Startup Settings.
Click the Restart button.
On the Startup settings, press 5 or F5 to enter in Safe Mode with Networking.
Once your computer is in Safe Mode, you can try the following troubleshooting steps:
How to reinstall your video driver
Another issue that can cause your computer to experience a black screen is a buggy graphics driver update, which you might have received through the Windows 10 update. Other times there isn't a problem with the update, but the video driver may have got corrupted causing to malfunction and display a black screen.
If the video driver isn't working correctly, you can uninstall it in Safe Mode, and then let the operating system reinstall the driver automatically upon restart.
- Use the Windows key + X to open the power user menu and select Device Manager.
- Expand Display Adapters.
Right-click the adapter and select Uninstall.
Quick Tip: You can also select Delete the driver software for this device option to remove the driver from your computer. Sometimes, this is recommended, but if the operating system can't find the driver online, you'll need to download the correct driver for your video adapter from your PC manufacturer's website.
Click OK to confirm.
- Restart your computer to complete the task.
Once your computer restarts, Windows 10 should automatically reinstall the video adapter driver and hopefully, the black screen will disappear.
If you're getting a black screen on a device that you upgraded from a previous version of Windows, you may need to download updated video driver from your PC manufacturer's support website to fix the problem.
How to disable fast startup
Sometimes the black screen problem keeps happening because fast startup is enabled on your computer.
While in Safe Mode, you can use the following steps to disable fast startup:
- Open Control Panel.
- Click on System and Security.
- Click on Power options.
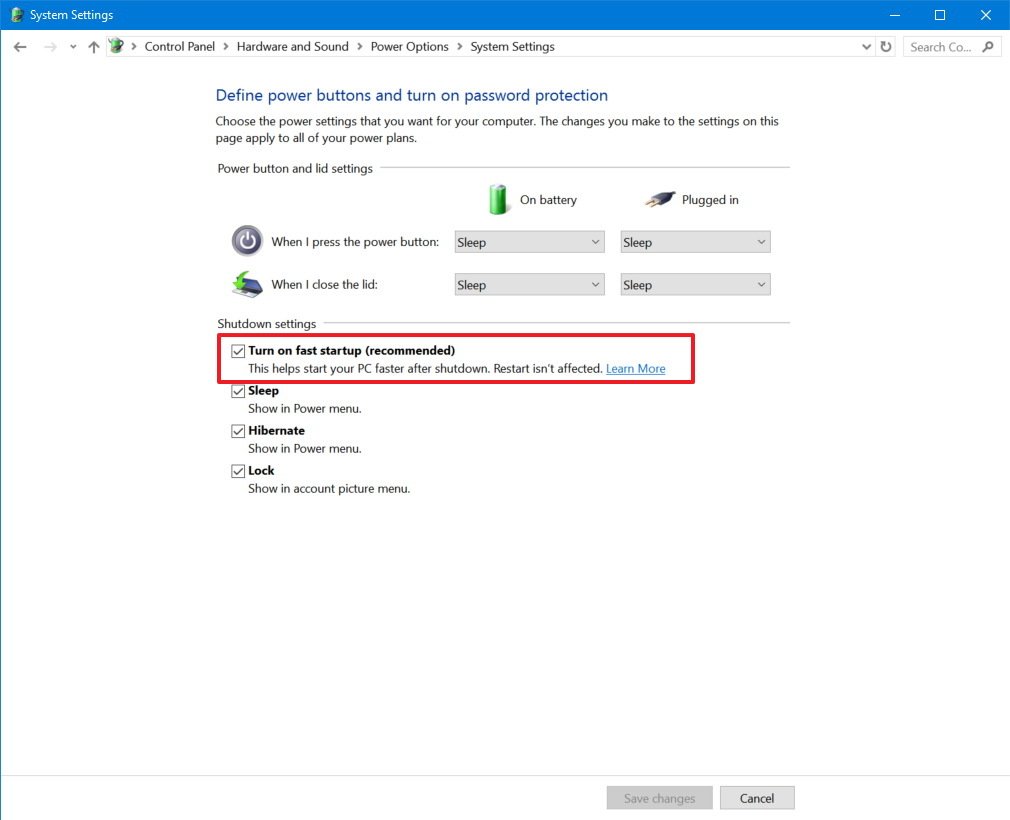
Select the Choose what the power button does link on the left pane.
Click the Change settings that are currently unavailable link.
Clear the Turn on fast startup (recommended) option.
- Click Save changes.
- Restart your computer to complete the task.
It's important to note that depending on your hardware configuration, your computer may not include support for fast startup.
How to disable high contrast
If you have high contrast enabled on your computer, it could also be the reason why you're getting a black screen.
While in Safe Mode, you can turn off high contrast using the following steps:
- Open Settings.
- Click on Ease of Access.
- Click High contrast.
Select None from the drop-down menu to turn it off.
- Restart your computer to complete the task.
Terminate Run Once processes
Run Once process can also the be the reason of black screen after signing into Windows 10.
To terminate Run Once processes on Windows 10, do the following:
- Use the Ctrl + Shift + Esc keyboard shortcut to open Task Manager.
- Check the Processes tab and Services tab and look for any instances of RunOnce.exe and RunOnce32.exe.
- If you find an instance in the Processes tab, select the item, and click on End task. If you find an instance in the Services tab, right-click the item, and click Stop.
- Click on File.
- Select Run new task.
Type the following command to restart your computer:
shutdown -t00 -r
Click OK to execute the restart command.
- Restart your computer to complete the task.
Create a new user account
A problem with your user account can also be the reason your computer is experiencing a black screen.
You can see if your user account is causing the black screen by creating a new account while you're in Safe Mode.
To create a new user account in Safe Mode, do the following:
- Open Start.
- Search for Command Prompt.
- Right-click the result and select Run as an Administrator.
Type the following command to create a new account and press Enter:
net user tempuser /add
Remember to change "tempuser" in the command for the name of the account you want.
Type the following command to change the account type to Administrator and press Enter:
net localgroup administrators admin /add
Don't forget to change "admin" in the command for the name of your account.
- Restart your computer to complete the task.
Note that you're using Command Prompt instead of the Settings app to create an account. This is because, for some reason, Windows 10 won't let you create a new user account using Settings while in Safe Mode.
Once you restart your computer, sign in with the newly created account. If your computer is no longer experiencing a black screen, then the problem was something on your old user account.
If this is the case, you may want to switch to the newly created account -- for more help,
you can use our guide to move your files, link your user profile with a Microsoft account, and to delete the old account.
Did these troubleshooting steps help you to fix the black screen problem? Tell us in the comments below.

 Step 2: Berikutnya akan muncul tampilan seperti di bawah ini:

 Step 2: Berikutnya akan muncul tampilan seperti di bawah ini:


